The content of the article
How to prepare the walls for painting? One phrase and do not tell. After all, the final look of the room will depend on the quality of the preliminary preparation. Agree, a pleasant little, when after drying the finish coating pits, bumps and other troubles appear.
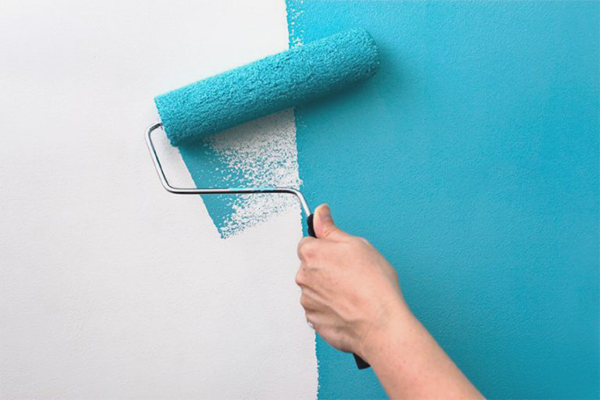
Some neglect the preparation of the walls for painting. The result is depressing. In order not to be in a similar situation, let’s analyze each step in detail.
Removing the old cover
Modern wallpaper or putty may well serve as a basis for painting without prior preparation. But, only in the case of a perfect grip on the wall. Otherwise, after drying the paint, every slightest blemish would be unpleasant to cut the eyes.
To avoid risk, it is much easier to remove any coating to the ground and apply a new one. So you will be sure that the paint will later fall perfectly flat.
Wallpaper.In order to quickly remove them from the wall, you will need:
- Warm water
- Wide hard spatula
- Needle roller
- Thick film
- Special removal agent or regular bath foam
- Spray Gun, Wide Brush or Fluffy Roller
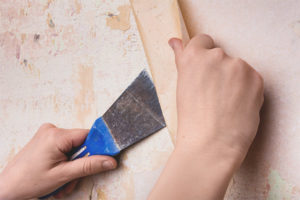
Procedure. Covering a dense polyethylene floor next to the wall. It is necessary not to predict it. Then the wall is treated with a needle roller. Water penetrates more easily through the pinholes. Therefore, the cleaning process is greatly facilitated.
It does not matter what wallpaper to remove, paper or non-woven. It is better to pre-punch both species. Now you need to dissolve a special tool in warm water. It is advisable to comply with the recommendations of the manufacturer. If such a tool is not at hand, then you can add 2-2.5 caps of any foam for 10 liters of pure water.
Council Foam is beautifully replaced by any fabric softener.
Thoroughly stir the resulting liquid, then carefully moisten the old wallpaper. Roller or brush copes well with this task. But we recommend using a spray bottle. Liquid consumption will be less, and the surface area will increase.In addition, this method is the least dirty, it leaves almost no stains.
After applying the liquid must wait 16-18 minutes. During this time, it will saturate the wallpaper and penetrate through the holes to the adhesive layer. The correctness of the treatment is evaluated visually. The coating becomes loose and convex.
Now take a spatula and scrape off the old wallpaper from the wall. Paper are removed lumps, and non-woven - almost a whole cloth. But, with proper processing, both species are removed quite well and quickly.
Council If in the process of work there are pieces that are badly lagging behind the wall, then you should not otkovyrivat them with a spatula. This can be a decent scratch or fossa. It is better to re-apply the solution, and again let it soak for a while.
Sometimes the above method does not work at all. So the cloths were glued not on wallpaper paste, but on a stronger substance. In this case, you have to work hard. How - read below.
Putty, old paint and "waterproof" wallpaper. Such an old coating removes a lot of trouble during removal. But, if you leave it and paint the walls on top, then there will be even more problems.For example, no matter how well the putty was applied, over time it will tend to flake off. And the paint does not contain binding components. Therefore, one day the whole thing with a banging noise clatter to the floor. Or, at first, it will become swollen with a hump, and only then will fall off.
In order not to contemplate a similar picture, stock up:
- Grinder or drill with a special nozzle.
- Film and masking tape. It will take a lot.
- Goggles, respirator, gloves, shoe covers.
Procedure. Close all that is possible and not film. If necessary - fix the tape. Dress up in remedies. Boot covers - not on feet. Hair cover them! Believe me, it is almost impossible to wash the resulting fine dust from them. Anyway, no one sees what is there on his head.
Then turn on the sander and begin to clean the wall. If you are 100% sure of the quality of your putty and plaster, then it is not at all necessary to remove the entire coating to the ground. If you have any doubts or when you knock on the wall you hear deaf sounds - congratulations! We'll have to plow. But then you will have the opportunity after trying your hand at filling the wall from scratch.
After the most rough work is done, a new stage begins. Before this, we advise you to remove all the old film with dust and lay another. Otherwise, the dust particles will take off at your movements and sit on the walls. This will prevent good adhesion of the filler to the surface.
Council You can try to remove the old paint with a special wash. But it is a very smelly business, a long one. A putty will still have to be removed later.
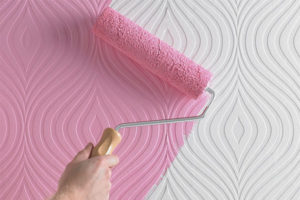
New Coating
It doesn't matter at all what the paint is supposed to be applied to. Whether it is decorative plaster or wallpaper for painting, you still need to pre-align the wall and putty.
So what do we have? Scary ragged dusty wall. First you need to clean it from dust. Otherwise, putty just will not hold. This can be done with a stiff brush or an old vacuum cleaner.
Do not rush to direct the filler solution! Carefully inspect the wall for mold or traces of fungus. In case of any signs, treat the damaged area with a solution of copper sulphate. It is advisable to capture about 35-39 cm of the clean surface around in order to avoid spreading the dirty trick on.If we neglect this stage, then in the near future we can safely expect the appearance of black spots of the fungus. And already on top of the finish painting. Do you need it?
Council In order not to risk, we recommend treating the entire surface of the wall with antifungal agent. Better to perebdet.
After drying, do not run again for a package of putty. And we take any soil of deep penetration again we smear a wall. As a rule, such a mixture is always liquid, like water. And applying it with a brush or roller is an unaffordable luxury and large overrun. Try using a spray bottle. Priming will be more uniform and almost waste-free.
Council Who has a garden sprayer, by all means use. The size of the nozzle is adjustable so that the primer particles do not clog, and the pressure will help to perform this stage of work quickly, economically and efficiently.
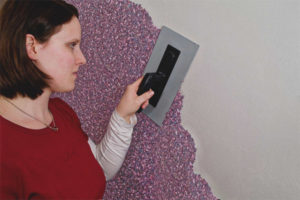
But now, a day after applying the primer, you can carry a bag with putty. And again, do not rush to dilute it with water. Lighthouses installed? Rule and spatulas cooked? And you will putty on the eye? Well, if you are confident in your abilities ... In fact, even professionals with many years of experience use the beacon alignment system for walls. Although, any amateur always flatters himself. Try it and you.After all, surely there is time and money to re-prepare the walls for painting ...
Do not show off. Set the level of the beacons. And for coarse putty choose a coarse-grained mixture. Dissolve it according to the instructions and do not hesitate. Apply more on the rule and lead it upwards. Just do not slap the solution on the wall! It will fall on you back. Not all masters use this technique of drawing, what to say about non-professionals.
And do not try to simultaneously smooth out all the irregularities. Then you still need to put the finishing putty fine-grained gypsum-based. So she evened out minor flaws. By the way, large ones can be gently smoothed down after 40-45 minutes of drying. To do this, take a special wooden construction "grater" with a large mesh or sandpaper. And smooth circular movements to remove large crumbs putty.
Council In order not to pull the beacons out of the walls, use aluminum. They do not rust over time, they can be safely left in the wall.
After the draft layer dries well, you can apply a finishing putty. The method of the final preparation of the walls depends on what result is needed (haze or gloss).
Matte. Put a finishing putty with a thin layer, gave it a good dry.Then the surface was polished with dry sandpaper to a slight roughness.
Glossy. Do not wait for the complete drying of the finishing layer. 30 minutes after application, possible irregularities are smoothed with wet sandpaper.
Council For the best result, sandpaper is fixed on a building grater or an even bar. Use screws or studs. Glue will not work.
Useful recommendations
- Most preparatory work is greatly simplified with the help of professional power tools. But the cost of some of them exceeds the price of the repair itself. To get them is too expensive and unjustified. If you have to handle a large area, then look for ads for rent. Most construction firms provide this service at a very affordable price.
- Sometimes a person absolutely does not know which side to hold the brush or spatula. Do not be surprised, this is now found everywhere. We recommend to hire a brigade of master finishers. Payment for their services will undoubtedly be lower than the cost of materials spoiled by an amateur.
- However, if you have a great desire to learn how to do everything yourself, then try. Practice shows that when a person does for himself, the result is very good even the first time.
How to prepare the walls for painting? As you can see, it is not so difficult. More time will be spent on the final drying of the finish coating than on the work itself. As the saying goes: the eyes are afraid, and the hands ... And why are your hands worse? Follow all recommendations and everything will turn out in the best possible way.
Video: how to putty for painting walls


To send