The content of the article
It is believed that gloxinia reproduces only by dividing the tubers and leaf cuttings. However, it grows well from seed. True, it is necessary to dance thoroughly with sprouts until they come into full force. But what a magical joy it is to see how a full-fledged adult plant is born practically from dust!

How to grow gloxinia from seeds? Now we learn everything in detail.
When to plant gloxinia
We need the plant from the seeds to have time to grow and grow to adult sizes. In this case, it should bloom, increase the tuber and go into a state of rest. Modern gloxinia, as a rule, begin to bloom at the age of 6-7 months from the emergence of shoots. This is with proper care.
Based on this, we calculate the sowing time. Gloxinia goes into hibernation around September-October. Minus time to bloom. And minus the period of development from germination. It turns out that you need to sow no later than mid-February. In the past, it's even better, but if you can provide good lighting.
Sow gloxinia
The greatest difficulty is seeding. Gloxinia seeds are very small. In their direction can not even breathe, otherwise scatter. Therefore, it is recommended not to collect them yourself, but to purchase already prepared ones. Manufacturers often granulate them and pack them in capsules so as not to lose.
These granules with the wrong planting are often an insurmountable obstacle to germination. How to sow gloxinia? First you need to prepare the soil and containers.
Dishes. A container with a practically hermetic lid is best suited. It is desirable that it be transparent. Because gloxinia rises only in the light. In the dark, shoots can not wait at all.
Instead of a cover, you can use glass or polyethylene. Only be sure to fit snugly to the side of the pot.After all, it is necessary to maintain a high level of humidity constantly. And it is necessary to accustom shoots to usual air gradually.
Polyethylene can be pressed to the side of the tank with an elastic band or clothespins.
Priming. Buying a ready-made mixture in the store, you save yourself from having to cook it yourself. But having prepared the soil with your own hands, you will surely be confident in its quality and composition.
For example, go to the forest or park. There you find birch and pine. You take the land from under them and carry it home. There it is carefully sifted, mixed in equal parts. Then add the same amount of pure sand. Everything, mix for gloxinium is ready.
That's just no one canceled decontamination. Indeed, in a moist warm environment, putrefactive processes develop very quickly. And they are not at all beneficial for young shoots. Therefore, it is necessary to place the soil mixture twice in the freezer with intermediate thawing. Then shed strong hot solution of potassium permanganate. And after 12 hours, ignite in the oven at a temperature of + 105-110 ° С. This will destroy fungal spores and harmful microorganisms.
Description of the process step by step:
- At the bottom of the tank poured the prepared soil, level and compact. Lightly, not to the briquette.
- Liberally sprayed with warm water from a spray bottle.The ground should be wet, but not wet.
- Carefully lay the seeds on the surface.
- Tightly close the container with a lid.
All sowing is over. It is very important to water the ground before the start, because then the seeds can fall into the ground. And the depth of even 0.5 cm dramatically reduces the chances of emergence.
We are waiting for sprouts
Now our capacity with crops needs to be put in a warm, bright place. The window sill does not fit, it's too cool there. Alternatively, place the container in a special warm cell made of foam or foam substrate. Plus add extra lighting. Happy owners of fitolamp, it's easier for you. Although, fluorescent lamps are also suitable.
It is very important not to open the container lid until the first shoots appear. High humidity and heat promote seed germination. But, depending on the shelf life and conditions, this process can last from 2 weeks to 3 months.
Quality seeds sprout quickly. The bad ones ... don't sprint at all. The only clarification: as soon as the first green shoots appear, do not rush to remove the shelter. The seedlings are still too weak, so let the minitplitz be still.
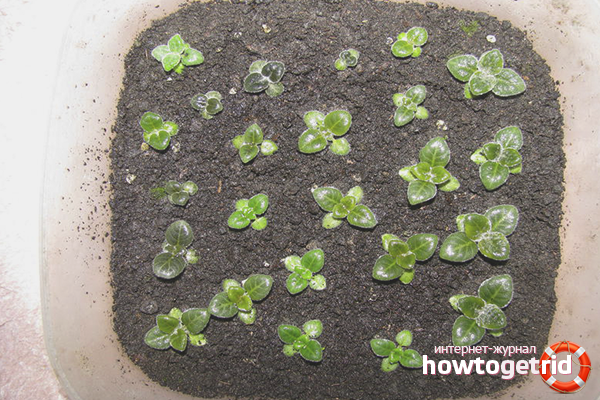
Gloxinia pick
In general, before planting in a permanent place, gloxinia seedlings must survive at least 4 picks. And with the obligatory pinching of the center stem. This is necessary for the rapid development of additional lateral roots.
At the same time there is no exact schedule when exactly to swoop gloxinia sprouts. Need to look at the situation and the status of seedlings. As soon as they noticed that they stopped developing and growing, dive right away. Or another point: the sprouts did not have enough space, they are cramped and dark nearby. So again the picking procedure.
By the way, gloxinia seedlings are too small. They are very easy to hurt with your fingers. If you are not a microsurgeon or a jeweler, then use an ordinary teaspoon for picking. It is very convenient for her to pick up the gloxinia with a clump of soil.
Seedlings care
Gloxinia sprouts do not require special conditions. It is enough to follow three recommendations:
- Keep track of soil and air humidity inside the container. If necessary, sprinkle lightly with clean boiled water. The temperature is slightly above room temperature. You can generally use the melted, but not from the street, but from the freezer. Naturally, heated.
- When the second present leaf appears, gradually accustom the shoots to room temperature and humidity. In other words, start slowly airing the mini table and tempering the seedlings.
- The degree of lighting does not change. It can be raised the lamp higher so that they less heated shoots, but the brightness does not diminish.
If you did everything correctly, then approximately two months after germination, gloxinia will have 4-5 true leaves. This is the time to do the last picking and plant the plants for permanent residence.
We plant gloxinia correctly
For a young plant, a pot or a cup of no more than 120 ml is enough. The root system is still too weak and small to master a larger volume of soil. And this threatens to sour and mold.
In such a glass gloxinia grows beautifully, develops and blooms. Now it can and should be fertilized.
Feed the plants
You should not use organic matter to fertilize gloxinia until a full-fledged tuber has developed. It is better to use complex mineral fertilizer, reducing the dosage by three times.A full dose can simply burn off a weak root system.
For the same reason, do not make your own mix of different feedings. It is very easy to overdo it. And with the burnt roots, no plant can exist.
Gloxinia care from seeds
From competent care depends on the result of your multi-day work. Some sources recommend not to give gloxinia from seed to bloom in the first year. Ostensibly it weakens the plant. But after all, if you take good care of it, fertilize it properly and water it on time, then what kind of weakening are we talking about?
And if you throw a flower to the mercy of fate, then it will be bent without flowering. It is very important to see the flowers at all in the year of sowing. Otherwise, the plant will not go through its entire vegetation cycle. In the normal gloxinia in the fall is going to rest. The foliage begins to wither gradually, and then the whole above-ground part dies off altogether.
If the plant feels itself hearty, but is not going to bloom, it means that it will not go to rest either. In this case, you will have to take good care of the gloxinia all winter so that it enters its normal vegetative cycle.
Typically, such “rassters” bloom very early in the second year of life, and by the fall they quietly fall into the usual course.Be sure to give them extra light on short winter days and fertilize them like in summer. Otherwise, gloxinia gets lost in the seasons and may die. Then all your labors will be in vain.
How to store gloxinia in winter
If the plant has successfully grown a tuber, then it is advisable that the first year should not be left to winter in the soil. It is necessary to remove it from the pot, thoroughly rinse and dry. Then you need to put the "teenager" in a tight bag with wet peat or sawdust. Mandatory openings for ventilation and evaporation of condensate.
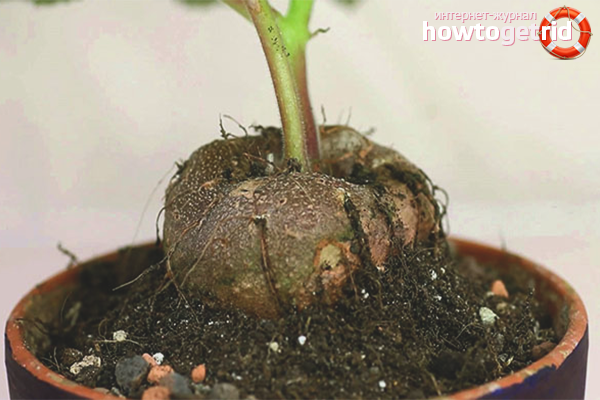
Next, the bag is placed in a dark cool place. About once a month you will need to inspect the contents in time to detect the appearance of rot or mold. But, it is quite possible that your gloxinia will avoid such a fate.
Carefully move the soil away from the stem of the plant. Did a well-developed tuber fall into sight? Then we leave the gloxinia to spend the winter right in the pot. Again we are waiting for the complete extinction of the aboveground green mass. We cover the top with a dense package with several holes. And we remove the darkness and coolness.
If the place is too dry, then occasionally we moisten the soil.But do not fill!
Both variants are well tolerated by young gloxinia. Under normal storage conditions, fresh shoots of this year should appear in February. From that moment on, the pots are brought to the light. And take care of them, as for the full adult flowers.
Useful tips
- If, when airing a mini table, gloxinia shoots begin to wilt, then for a while refuse from this undertaking. It is possible that the seedlings are still too weak. Let them grow a little more.
- Do not use peat tablets for sowing gloxinium. The root system of seedlings is too tiny to overpower the entire volume of peat. And the whole thing can sour safely. Then the young seedling you will not help.
- Some sources recommend sowing gloxinia in a hydrogel. We do not recommend this. Because you cannot control the moisture level of the substrate. It is better to add hydrogel cubes to the soil when planting the sprout in a permanent place. This will help maintain an optimal level of moisture in the pot or cup.
- Be sure to use drainage for a pot with an older flower.Gloxinia loves to drink, but does not want to swim in the water. But for seedlings drainage is not necessary. You are already watching them too closely for pouring.
- The soil for planting for permanent residence is practically no different from the land for planting. The only difference is that some more peat is added to the pot. It helps to breathe freely young roots. In addition, slightly loosens the substrate. This is also a plus.
How to grow gloxinia from seeds? As you can see, this is a pretty troublesome, but very exciting. Some homegrown Michurins even manage to cross gloxinia on a windowsill and deduce plants of unique shape and color. Try it and you put such an experiment. Suddenly work?
Video: growing gloxinia from seeds


To send