The content of the article
How to restore the enamel bath at home? If you follow the instructions, it is very simple. It is important to carefully read the manufacturer’s recommendations and follow them precisely.
You can not bother to buy a new bath. Only here we have to take into account the costs of replacing pipes, tiles, delivery services, the work of porters ... the list is long. It is much cheaper to restore the enamel yourself. The task is time consuming, but quite feasible at home. But the resulting coating will last for 5-10 years, with careful handling of course.
Necessary materials
First you need to decide what method will be restored enamel bath. To choose the right, you need to carefully inspect the surface.
Deep chips, strong cracks, nasalness - here you will need liquid acrylic, acrylic liner or epoxy. With minor scratches, small roughness, a slight change in color will be enough cosmetic restoration of enamel.
From here it is necessary to prepare the necessary:
- Respirator. Required at all stages of work. There will be a lot of dust, unpleasant smells.
- Scouring powder with abrasive particles. Strictly without chlorine!
- Sandpaper several types of grit or grinding machine.
- Gloves. A few pairs.
- Rust remover. With strong sediment - oxalic acid.
- Napkins, old rags, rags, brushes. What is at hand is useful.
- Degreaser. Regular acetone is fine.
- Roller, brush or spray.
- Two-component enamel, liquid acrylic, epoxy, liner in the bath.
- Special adhesive foam if liner is selected.
- The desire to save and do something yourself.
Preparatory stage
For any type of work is very important preliminary preparation. Of course, you can neglect this stage, but then you should not curse everyone and everything, when in a month the new coating will be safely exfoliated.
Therefore, the first thing the surface of the bath is sprinkled with cleaning powder, then carefully polished. The better the top layer of old enamel is removed, the smoother the new coating will lie. Emery paper should be taken in different grains. First large, then small. The result should be a smooth matte surface.
Council If at this stage to use the grinding machine, then it will go much faster. Only without fanaticism! There were cases when craftsmen cleaned the walls of the bath through. Then only the replacement, the restoration will not help.
After the dust from grinding is cleaned - with napkins, rags, rags - you need to check if there are any rust stains left. By the way, the good old vacuum cleaner also perfectly removes dust. To remove rust, you can use the usual chemical means. If they do not help, then the solution of oxalic acid copes with the task. It is important to strictly follow the instructions on the packaging in order not to damage the enamel even more.
After all, it is necessary to fill the bath with hot water, let stand for 25-30 minutes, drain the water and dry the bath.
The next point is defatting.With a napkin soaked in acetone, carefully wipe the entire surface, not forgetting the sides and plums. After drying, you can proceed to the application of the restoration layer.
Putting enamel on the bath
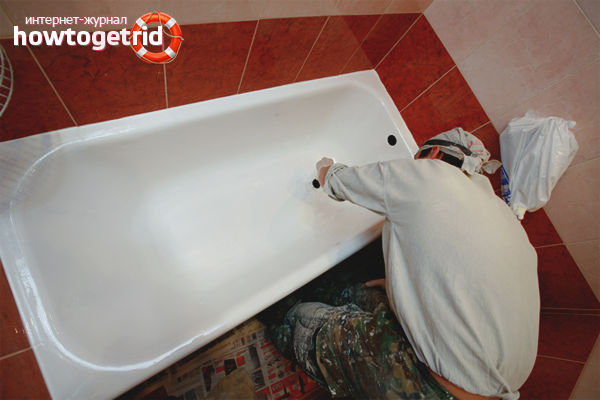
The most important thing is to carefully read the recommendations for applying enamel. Different manufacturers may vary the hardening time, the full polymerization, the technology of deposition.
Standard method of use:
- The amount of hardener and the enamel itself is measured accurately.
- Gently, but quickly thoroughly mixed.
- Using a brush, roller, spray a thin layer to apply the mixture.
The layer of new enamel should be thin so that no drops or stains are formed. No need to worry that the old coating shines through. After some time, you need to apply a second layer. If the old enamel is still visible, then it can be covered with a third layer, but no more. Otherwise, such a bath will dry out instead of three days for two weeks. And splashing in a basin so much time does not smile at anyone.
Stepwise application of acrylic to the bath
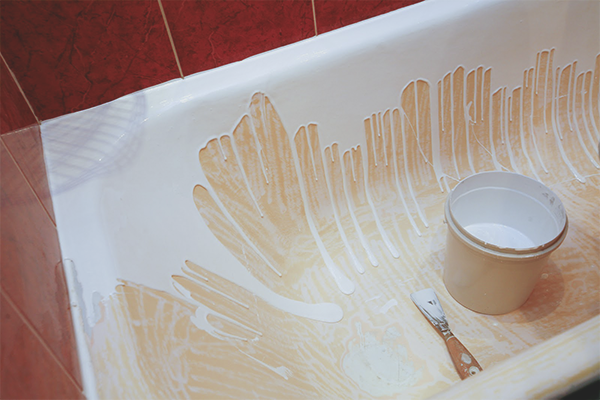
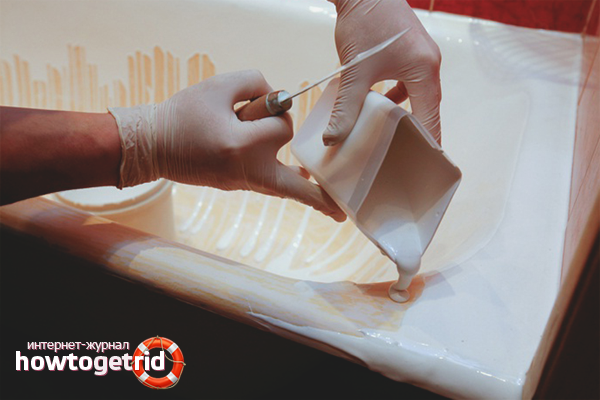
The technology of using liquid acrylic is slightly different from enamel:
- Liquid acrylic is gently mixed with the recommended dose of hardener.
- A thin stream of the mixture slowly pours on the edge of the bath.
- Moving in a circle, you need to smoothly pour acrylic until the entire surface is covered.
Depending on the manufacturer, acrylic enamel is polymerized from one day to five days. All this time it is impossible to pour water into the bath. It is advisable not to enter the room at all so that dust or dust does not get on the surface.
It is better to take a larger tank for mixing components. Let better excess liquid flow through the drain hole than 50 grams of the mixture is not enough.
Council The longer the acrylic polymerizes, the more the new enamel will last. So, one-day drying will please with a smooth covering all year. A five-day will allow you to enjoy a beautiful bathroom for at least 10 years.
Liner application technology
Acrylic liner in the bath - a good alternative to the restoration. Less work, better result. True, this method is suitable only for those who have a bath of a standard form. Of course, modern technologies offer custom-made acrylic liners - of any shape, size, or color. But the cost then soars high up, it is cheaper to buy a new one.
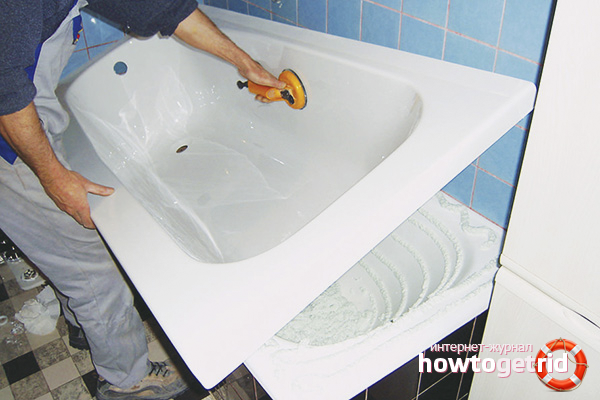
But for the owners of the classic configuration of the bath, the game is worth the candle. The technology itself is quite simple in execution. The preparatory stage is exactly the same as when applying enamel. But further:
- The liner is inserted into the old bath.
- Excess sides are cut off and drain holes are cut.
- Special adhesive foam is applied on the old coating and the outer side of the acrylic liner.
- With an effort pressed. For better grip, you can pour cold water in the bath to the top and leave it for 24 hours.
- In a day, the joints are additionally fastened with a sealant or liquid silicone.
- After complete drying, they happily splash in a new bath.
Council In order to evenly apply the adhesive layer, you need to choose the one in the cans. Get faster, and more convenient to use. By the way, in order not to get out extra glue, it is applied in strips, and not in a continuous layer.
Repair of enamel epoxy
The plot to be restored is prepared as described above.Then you need to take dry titanium white or porcelain fragments, ground into powder. Mixed with epoxy resin, prepared on the recommendation on the package. A thin layer is necessary to apply the mixture to the damaged area of enamel.
Such a patch dries for about 5-7 days, but it lasts more than three years.
Council Spatula epoxy is simple. But what to level? A simple razor blade does an excellent job. Only be careful not to cut your fingers.
Tricks, subtleties, nuances
For best results, there are some recommendations.
- The vacuum cleaner will relieve from the tedious collection of garbage, small crumbs, dust.
- For quick drying of the bath at the preparatory stage, you can use a hairdryer, a fan or simply arrange a draft. Only a hair dryer is needed household, not construction, so as not to overheat the old enamel.
- For better adhesion of acrylic to the surface can be pre-primed surface. However, the primer for acrylic smells very sharply, so a respirator and good ventilation should be required!
- When applying a new enamel brush very often stains.Spraying partially solves this problem, but here it is important not to overdo it. The soft roller is most convenient for coating. It is important to take a short pile, so that there are no bubbles left.
In order for the new coating to last as long as possible, you need to carefully use it:
- Do not wash in a bath with bleach or aggressive bleach;
- clean only with soft products without abrasive or acid;
- try not to drop heavy objects inside;
- Do not jump in the bath shouting: "My new, beautiful, brilliant!"
If you follow these simple recommendations, the new enamel will serve faithfully for several years, as well as allow you to save a good part of the family budget.
Video: bath restoration with liquid acrylic


To send