The content of the article
Since ancient times, people exchange eggs and Easter cakes for the Easter holiday. The tradition has been taking shape for many years, as a result of which many ways of coloring and decorating merchandise have appeared. With the words “Christ is risen!” Men and women, children and the older generation exchange eggs, later considering intricate patterns. Among other things, coloring eggs is quite an exciting process, able to rally the household. There are basic ways to consider them in more detail.
How to prepare eggs for painting
As mentioned earlier, experienced housewives, through trial and error, identified the main variants of egg coloring at Easter. However, regardless of the method chosen, they must first be prepared.
- A few hours before the intended staining, remove the eggs from the refrigerator and leave at room temperature.Such a move will help avoid temperature drops, because of which the shell cracks. An alternative is the puncture of the shell with a thin sewing needle that will not allow the eggs to burst.
- If food pigments or onion peels are used as the primary staining method, it is recommended to wash the shells beforehand. To do this, use the kitchen sponge and soda. As a result, the paint will fall smoothly without streaks and blotchy patches.
- Before starting the procedure, degrease the shell, wiping it with vodka or medical alcohol. If neither is available, clean the surface with soapy water, then rinse thoroughly and dry.
- To paint the shells after dyeing, rub the surface of the eggs with vegetable or corn oil. Do not use cotton pads for this purpose, gently moisten the fingers in the composition, then spread it over the shell.
When you have prepared the "material", proceed to painting. Choose the best option for yourself, then follow the instructions carefully.
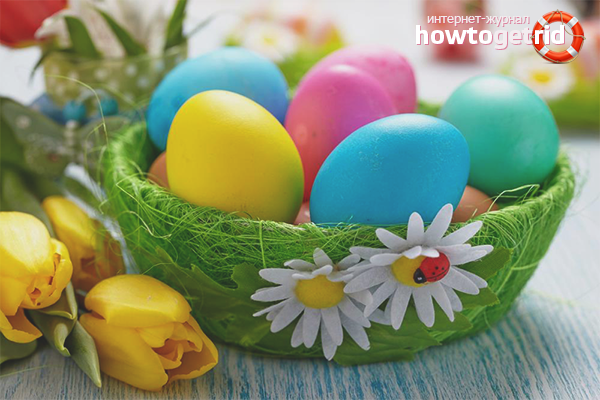
Method number 1. Food colorings
Food dyes are rightly considered the most common type of coloring of Easter eggs. You can buy ready-made colors or display your own shades. Pigments can be pearlescent, glossy or matte, it all depends on the manufacturer.
To properly prepare the composition, in advance, take care of such a number of containers, so that each color has a separate bowl. Dilute the paint with water at room temperature, there should be a lot of liquid so that the eggs in it completely drown.
After dilution of paint, pour in 30 ml. table vinegar solution, then send the cooked or raw eggs in the bowl. The duration of exposure varies, it all depends on what intensity you want to get a shade.

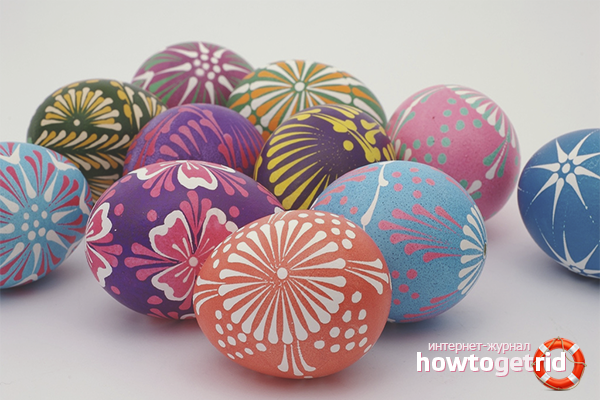
Stencil
- Purchase tracing paper on the Internet or in an office store - ultrathin paper. Cut out any stencil-shaped image from it (the inside is removed). Anything can be used as a picture: favorite cartoon characters, Easter themes, Jesus Christ, etc.
- The snapshot for the stencil can be downloaded on the Internet. The end result depends on the quality of the original image and the material itself.When you make the stencil base, namely print and cut it out, moisten the paper in room temperature water. The material should be elastic, repeating the shape of the egg.
- Attach the stencil to the shell, smooth out the creases. If your drawing is small, duplicate it in several places. Fix the stencil with gauze or a piece of nylon stockings (pantyhose).
- Dissolve food or natural dye, send eggs to it and boil them until ready. Upon completion of the procedure, remove the eggs, put them on a toothpick or newspaper, cool to room temperature. Once this happens, remove the gauze and stencil, enjoy the result.
Vegetable oil
- A beautiful result is achieved as a result of coloring eggs with the addition of vegetable oil. To properly perform the procedure, prepare two containers with the same shade. Pour in the first oil, and leave the second unchanged.
- Cook hard boiled eggs, cool to a temperature of 30 degrees (the same figure should be in the coloring composition). Dip the "material" in a bowl with paint, wait for the required interval (the exact time specified in the instructions).
- After that, remove the eggs, leave the paint to dry. When this happens, send the product to the second container with vegetable oil, wait a while. Dry the eggs, evaluate the result.
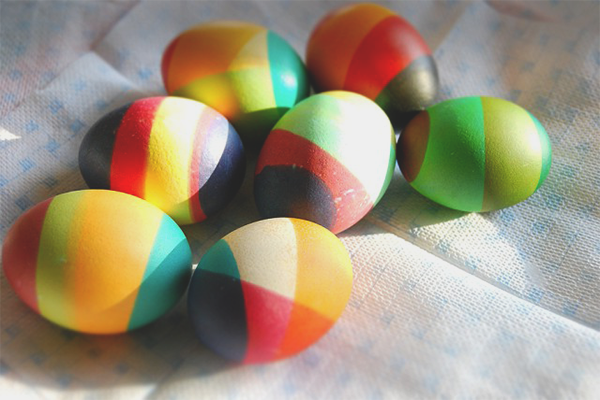
Insulating tape
- Cut the tape along to make thin strips (you can skip this step if desired). Prepare several containers with diluted paint, preferably choose blue and yellow.
- Glue the strip in the form of a spiral or any other pattern to your liking. Dip the eggs in a blue bowl, wait a while, reach and wait for it to dry. Remove the tape.
- Now paste the following strips, which will slightly cover the previously obtained pattern. Dip the egg in the yellow paint, wait an interval, remove and dry.
- In the end, you get a yellow egg with blue and green stripes. The option is good because it allows you to experiment with getting new shades by overlaying one color over another.
Stationery gum
- Get in the office store gum, which usually drag the banknotes (silicone base). Cook hard-boiled eggs, cool, cook paint one or more shades.
- Then you can do in two ways.The first involves painting the eggs in any color with prominent white lines (rubber bands are attached to a previously unpainted egg). The second option is a two-phase color, with the result that the lines are the color in which the egg was painted initially.
- Consider the second option, it is more complex. Paint the egg yellow and dry. Wrap stationery gum in a chaotic manner crosswise. Dip the “material” in the green paint, wait for the pigment to set. Dry, remove the gum. You will see that the egg turned blue with yellow stripes.
Plant leaves
The technique is similar to the stencil technique with only one refinement - plant leaves are used as a pattern, most often parsley and dill.
- To get an accurate result, tear off a few leaves, attach them to the shell, fix with a gauze cloth or a capron stocking. Dip in the paint, wait a while.
- After the expiration date, remove the eggs, cool and dry them. Unroll the fixing material, remove the leaves, smear the surface with vegetable oil and enjoy the result.
- An alternative to the leaves can serve as the same electrical tape, self-adhesive paper or adhesive tape. Cut the material you need from the material, attach it to the defatted shell of the pre-boiled egg. Place the product in a pigment bowl, then remove and dry.
Method number 2. Natural dyes
- As natural dyes can be onion peel, beet, turmeric, carrot, birch leaves, calendula, orange or lemon, spinach, red cabbage, nettle, coffee.
- The main feature of the "national" coloring is considered to be that the composition acts slowly. As a rule, it takes about 8-10 hours to get the result.
- To prepare the solution, pour water into the pan and add a large amount of the selected dye. Pour in 35 ml. table vinegar, mix. Bring the solution until the first bubbles appear, then reduce the power and boil for another 15 minutes.
- When the paint is ready, insist on it for about half an hour, then send eggs to the tank and simmer them on low heat for 25 minutes. Then turn off the burner, leave the product in the solution overnight.
Turmeric
To give the eggs a seductive golden hue, use ground turmeric.
- Boil water in an enamel saucepan; add 90 g. turmeric, bring to a boil. Place raw eggs in a container, cook them until ready, then let it brew for another 8 hours without removing.
- It is recommended to carry out the procedure with extreme caution, since turmeric is difficult to remove from the surface of furniture and clothing, however, like other natural dyes.
Red Cabbage
Broth based on cabbage will give the eggs a rich blue hue.
- Crush the whole head of cabbage into small slices, place in a saucepan and cover with boiling water. Add 180 ml. table vinegar solution, cover and leave for 10 hours.
- After the expiration date, send eggs to the container, monitor the color intensity every 2 hours. Then remove the product and allow it to dry. If desired, paint the surface with gouache or felt-tip pens.
Beet
Beets will help to paint the eggs in a raspberry or pinkish hue, it all depends on the duration of exposure of the product in solution.
- Grate 4 medium beets,then mash the resulting composition with potato mash or grind in a blender.
- Pour the mixture with boiling water so that the water completely covers the beets. Pour in 150 ml. vinegar concentration of 9%, wait 6 hours.
- Put boiled eggs in the pan, let it brew for 5 hours. After a time, remove the product, leave to dry.
Onion Husk
Onion peel will dye eggs in a red-brown shade with bronze tint
- To prepare the coloring solution, you will need to take a husk of 4 kg. Luke. Raw materials must be sent to a large saucepan and pour boiling water over it.
- Put the container on the stove, bring the mass to a boil and simmer for 1 hour. After that, cover with a lid, leave to infuse for 24 hours.
- After the due date, skip the broth through a colander or gauze, boil eggs in it for about 10 minutes. Then do not remove the product from the pan, leave to cool completely.
How to make patterns on eggs
Regardless of the chosen method of coloring, you can create patterns on Easter eggs with the help of scrap materials.
Pic
- Cook round-grain or long-grain rice, soak the egg in water and roll it in rice so that the grains stick. Tie a stocking or gauze, secure with rubber bands on both sides.
- Prepare the coloring pigment, dip the eggs in it and wait for the required period of time. For this method are better natural dyes.
- When the eggs are painted, remove them and leave to dry completely. Remove the cloth, remove the rice, grease the surface of the shell with sunflower oil.
Silk fabric
Eggs can be dyed with fabrics, silk or cotton with existing patterns are ideal for this purpose.
- Dampen an egg in hot water, wrap a piece of cloth over it so that the drawing fits snugly in the surface of the shell. Sew an egg with threads around the perimeter so that the fabric does not slip.
- Wrap a piece of nylon, tie on both sides, creating a kind of candy. Pour 100 ml into the enameled pan. vinegar (6%), add water, send the eggs. Boil them for about 15 minutes, then turn off the stove.
- Let the eggs stand in the solution for another quarter of an hour, then place them in a bowl of cold water and leave to cool completely.Carefully remove the retainer and stocking, evaluate the fruits of their labors.
First, prepare the eggs for painting: remove them from the refrigerator, leave at room temperature, pierce the thin hole with a sewing needle in the shell. Consider the option of staining with food or natural dyes. Use a stencil, parsley leaves, silk fabric or scrap materials to create a unique pattern.
Video: how to paint eggs for Easter (different ways)


To send